Pensions and Lifetime Savings Association > Help > App

PLSA Conference App help

Here you'll find guidance on setting up and using the app. You can find lots more hints and tips on how to use the app, as well as event information, in the 'Info' section of the app itself.

Logging in

Logging in from email Logging in from email

1. Find your invitation. Check your email account for an invitation message from PLSA Events. Open the email invitation on the device you wish to use the app.

2. Download the CrowdCompass AttendeeHub app. If you haven't downloaded the app yet, do that first by tapping Download the App. If your device is not iOS or Android go straight to step 4.

3. Click Install on Android or Get on iOS and wait for the app to download to your device. Once the app has finished installing go back to the email.

4. Return to your invitation. Click Verify Account.


Please note: this is a single use link and can only be used once. If the Verify Account link has already been used you need to go to the app (or mobile web browser if not iOS or Android) and follow the steps for LOGGING IN FROM THE APP below.

5. Confirm your verification. Click Open App to complete the verification via your new mobile app or click on mobile web browser if you do not have the app.

You should now have logged in successfully!

6. If you have more than one smartphone or tablet you'll need to verify your account on each device. After downloading the app on each device follow the steps for LOGGING IN FROM THE APP below.


Logging in from app Logging in from app

1. Download the CrowdCompass AttendeeHub app. If you haven't downloaded the app yet, do that first by going to the App Store for iOS or Google Play for Android and searching for 'AttendeeHub'. 

If your device is not iOS or Android visit the mobile web browser instead, click Log In and go straight to step 3. 

2. In the app, tap the Log in button on the event homescreen.

3. Enter your details. Enter your first and last name where prompted, then tap Next. Enter the email address associated with your conference registration if prompted, then tap Next one more time. You will receive an email to verify your account.  

4. Open your email to find your 6-digit verification code.


Please note: For security purposes verification codes expire after 24 hours and can only be used once. If you're logging in on multiple devices, you'll receive a new verification code for each.
 

5. Return to the app or mobile web browser and enter the 6-digit code to finish logging in. Click Verify.

You should now have logged in successfully!


Setting up your profile

Build your profile Build your profile

1. Tap Profile at the bottom of the screen, then your name at the top of the screen.

2. Tap Edit in the top right.

3. From here, you can upload a photo of yourself, edit your profile information, add contact information, and link your account to social media platforms.

4. You can set your profile to public by toggling your selection under the Privacy Settings to “Public” to make your profile visible to anyone on the attendee list.

5. Tap Done in the top right to save your changes.

Already see information filled in? That's probably what we had on file. Feel free to update it if something changed. Our database will not be automatically updated so please also let us know if any of your contact details have changed by using the contact form on our website.

Delegate networking

Share contact details Share contact details

1. Tap More at the bottom of the screen, then tap the Attendees icon. 

2. Tap on someone's name to access their profile. Then tap Add Contact to request their contact information. They'll receive a notification to accept or decline.

3. To access your new contacts tap the Profile icon at the bottom of the homescreen and then tap Contacts. Here you’ll find a list of all the delegates you’ve exchanged contact info with.

Remember, every time you request someone's contact information and they accept, they'll receive yours too. 

1:1 instant messaging 1:1 instant messaging

1. Tap More at the bottom of the screen.

2. Tap the Attendees icon.

3. Find the person you would like to message and tap on their name. 

4. In their profile, tap the Message icon.

5. Write your message, then tap Send.

Checking Your Messages:
1. Tap Profile at the bottom of the screen.

2. Look for the Messages section. If you have a message, there will be a red circle with the number of unread messages in it.

3. Tap Messages to see who's contacted you.

If you don't want to chat, tap their name, then the chat icon. But don’t type anything, instead tap Block.

Scheduling appointments Scheduling appointments

 In-app appointments allow you to schedule time with other attendees or exhibitors to meet up for coffee, talk about your product, or follow-up on that session you just attended. To do this:

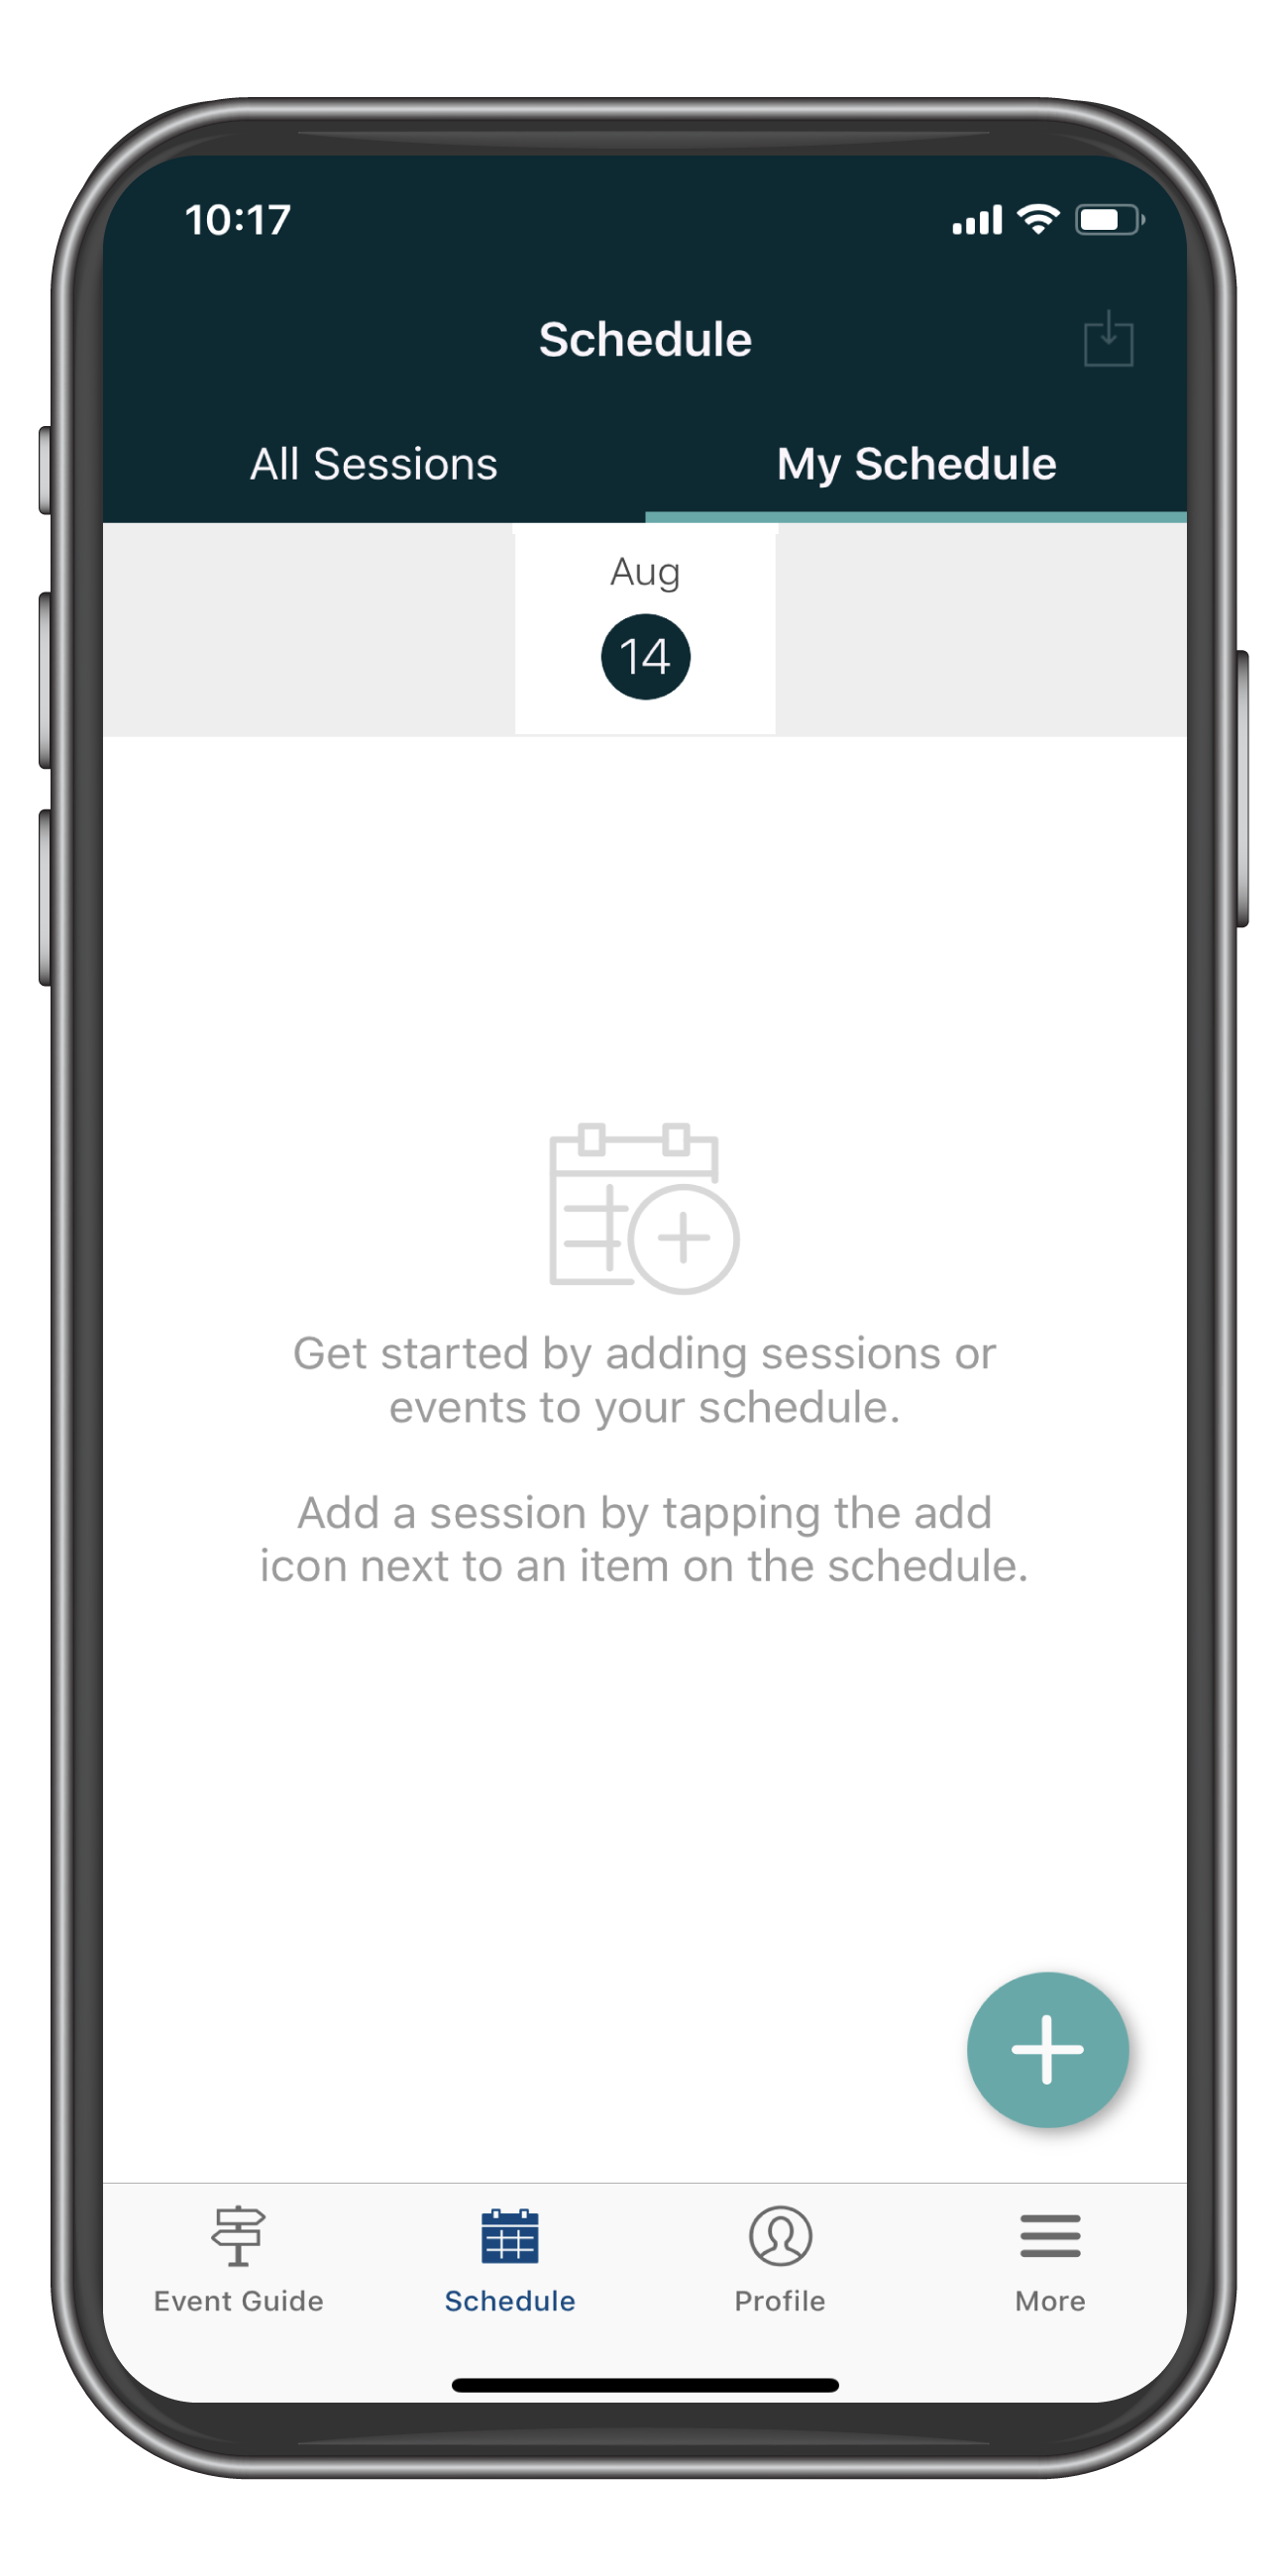
1. Tap Schedule at the bottom of the screen.

2. Tap the My Schedule tab at the top of the page, then tap the + sign in the bottom right.

3. Create an appointment by adding a title, location, and time.

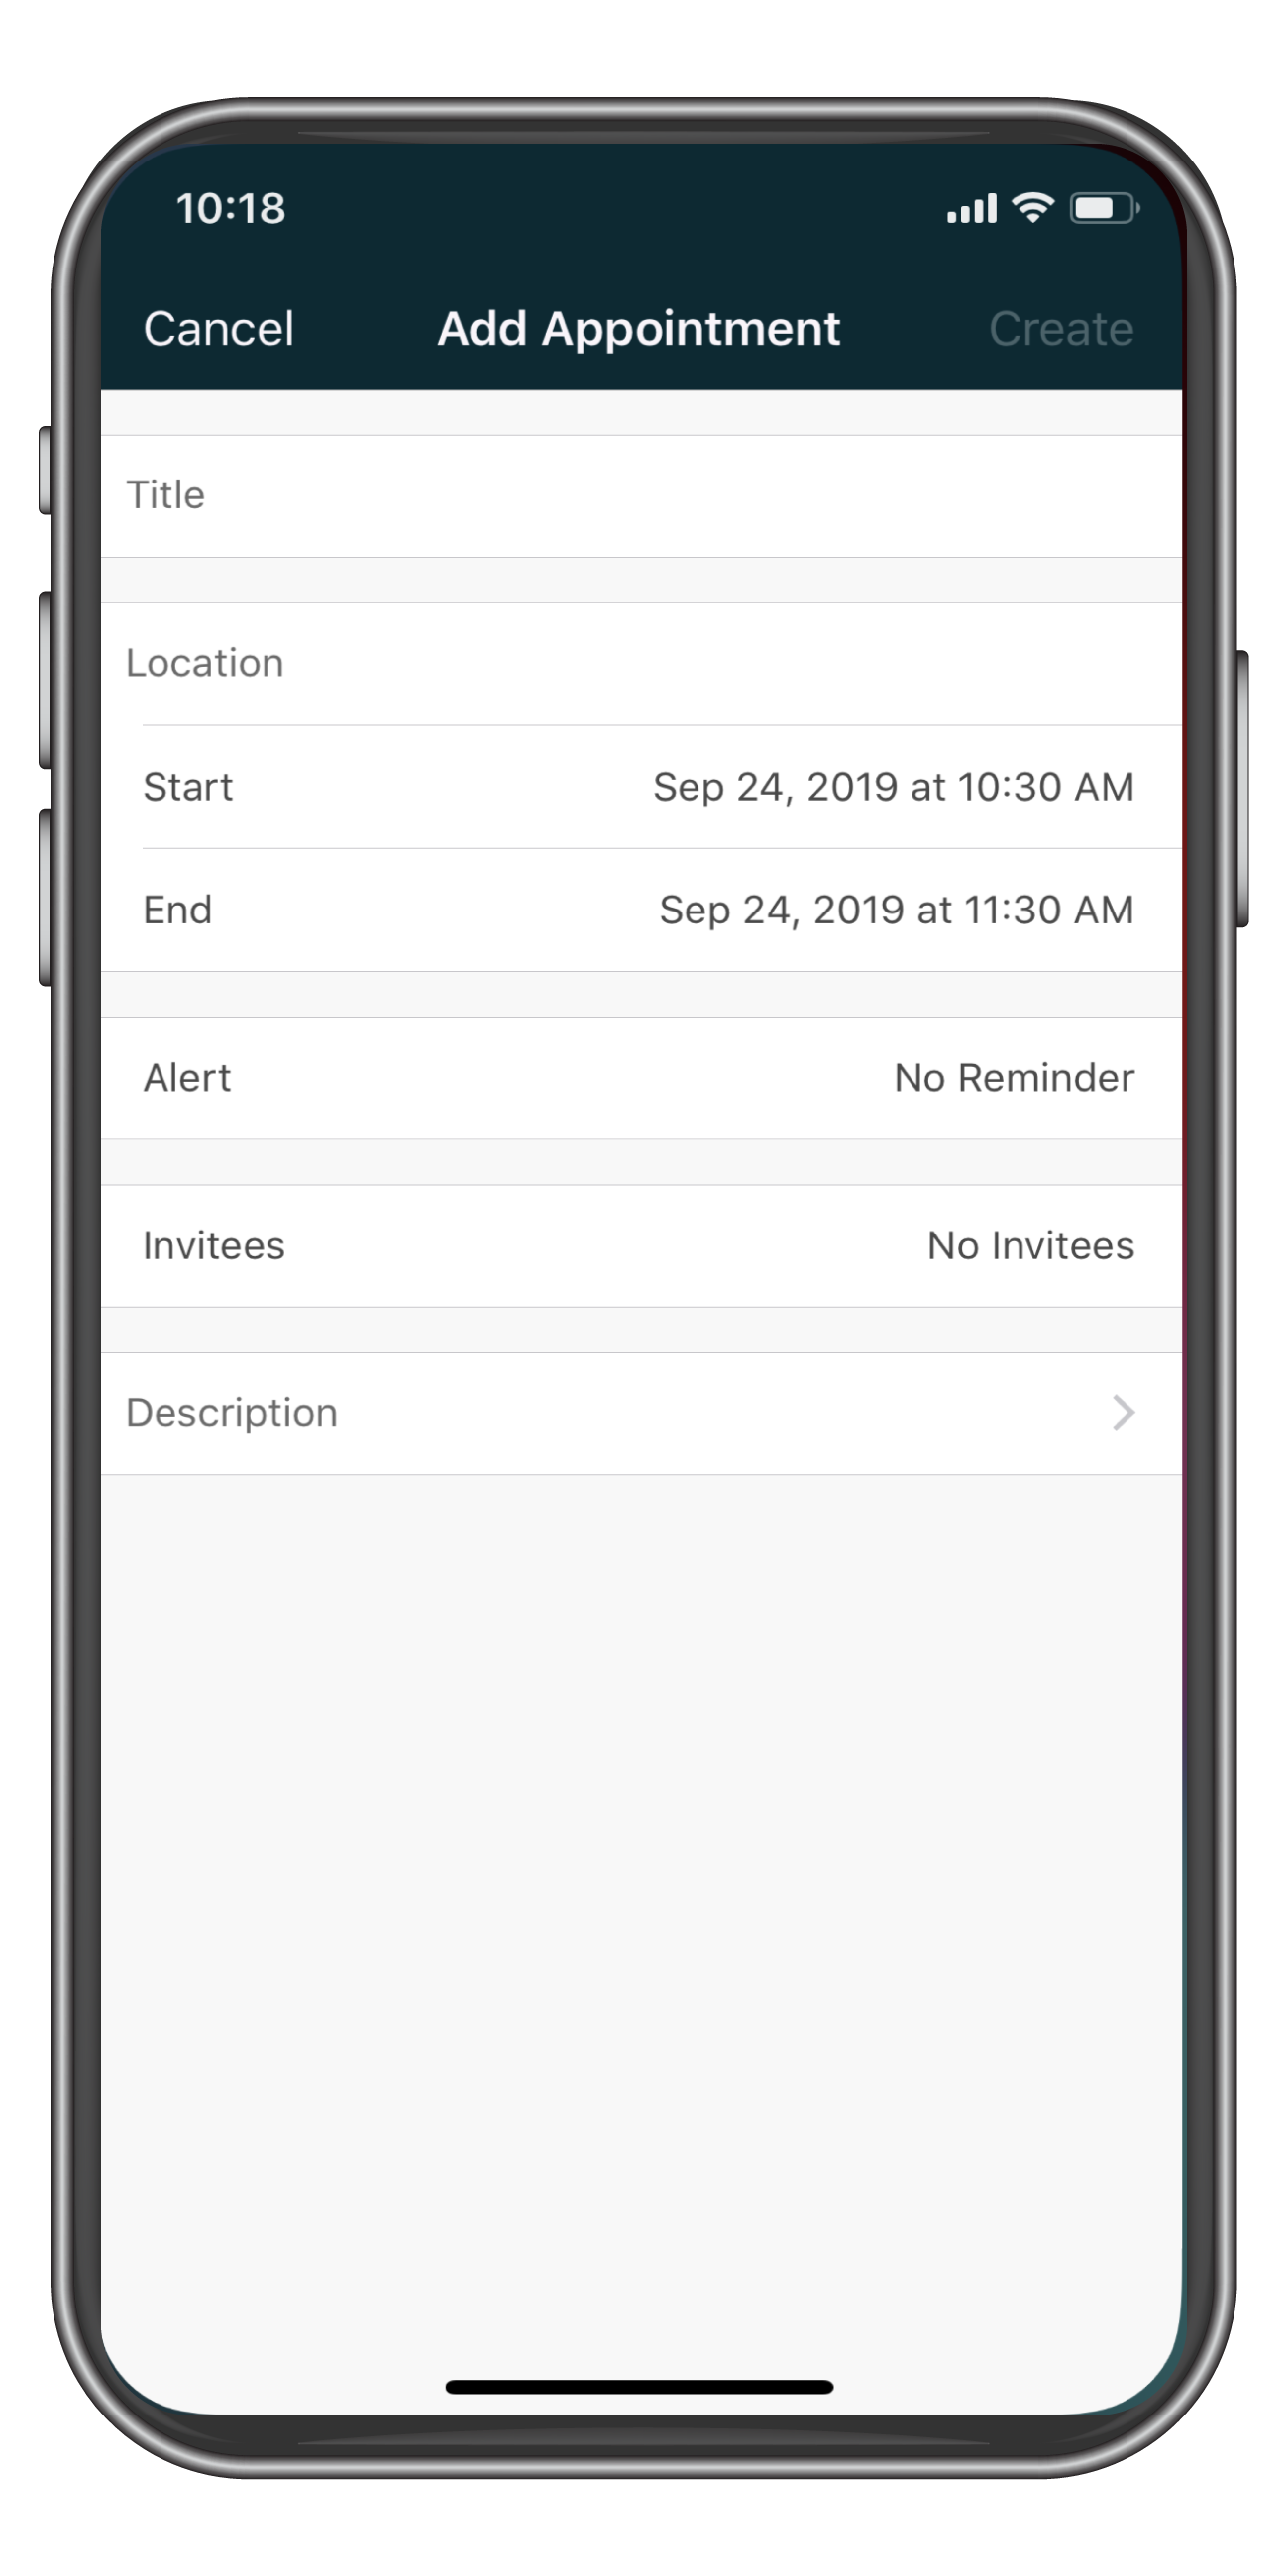
4. Tap Invitees to find attendees to add to your appointment.

5. Tap the back arrow to return to the Add Appointment screen.

6. Tap Create.

When you come back to the appointment in your Profile tab, you'll be able to see who has accepted, who has declined, and who hasn't responded yet. If they're taking too long to respond, send them a 1:1 message to make sure they see the appointment.